Ethernet cables are the standard cables commonly used to connect a modem to a router, and, likewise, to connect a router to a computer’s network interface card (NIC).Today almost everyone has plugged their computer into a broadband Internet modem with a cable such a cable is an Ethernet Cable.
These cables can be found pre-prepared with fix length, However sometime these pre-made cables are of not the desired length and then we are required to prepare a custom length Cable. This article provides the steps required for preparing a cable of your desired length.
These cables can be found pre-prepared with fix length, However sometime these pre-made cables are of not the desired length and then we are required to prepare a custom length Cable. This article provides the steps required for preparing a cable of your desired length.
Requirement
- Bulk Ethernet cable – cable of Catagory 5, CAT 5e or CAT 6 (expensive than CAT 5)
- Bulk RJ45 connector- crimpible connectors for CAT 5e and CAT 6
- Crimping tool- with this tool RJ45 are crimped to make them work and hold fix to the wire.
- Scissors- scissors are used to cut the cable and the upper plastic sheath
- Cable tester- in order to test the cable
You must also have a key Knowledge about Type of cable you are preparing i.e. whether a straight through or a cross-over cable is required.However In either case the connecting method is same. The only difference is in the order of wires/pins
Method of affixing Connector
Cut the cable of the required length but be sure to stay below 70 meter.
Note: The maximum length of a CAT 5 or CAT 6 cable should be no more than (328 feet) or 100 meter (theoretically) and upto 70 meter (practically).
Cut the upper plastic sheath of cable about an inch from the end of the cut cable. You can do it with scissors, a blade, or with crimping tool’s razor blade. In either way make sure you cut only the sheath and the cable is safe.
Unwind the cables and pair the similar color. Make sure all the cables are straight not curvy
Hold the connector upside down. The orange or green (according to the standard) you following should be at the left most.


Push the wires into the connector. Note the position of the blue plastic and of the wires going all the way to the end
 Top
view. All the wires must be all the way in and there should be no wire short.
Also the blue plastic must be inside the connector.
Top
view. All the wires must be all the way in and there should be no wire short.
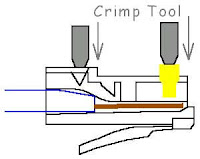
Also the blue plastic must be inside the connector.Now carefully place the connector into RJ45’s crimping point and press down the handles tightly.
The blue plastic sheath and copper tab are pressed through this crimping tool and now the connector is ready
For other end repeat the same steps but be careful about the color code. For straight through follow the same color code but for cross over swap (pin 1 with 3 and 2 with pin 6) i.e. swap white orange with white green and orange with green.
Before using/installing the cable, do test the cable through a cable tester.


An ethernet cable splitter can be one of the best investments made by any home or business.
ReplyDelete